We made a video on testing your charging system on your Go Kart 150.
The video include:
– The parts include in the charging system.
– A test on a functioning machine.
– Testing the stator and the rectifier / regulator itself separately.
The machine not running should give you between 12 to 13 volts. As you start the machine, the voltage should go up to around 14.4 volts. The stator voltage is AC, you should have more than 15 volts when testing. One of the most common problem on those machines is the ground wire to components, the wire go bad and you have lost of power or no contact anymore.
To test the stator itself, disconnect the plug, put your multi meter at 200 ohms, one lead to the yellow wire and one lead to the white wire. the reading should be between 1.2 ohm to 2 ohms.
To test your rectifier / regulator, disconnect the plug. On the rectifier, put the resistor usually use for the electric choke, the casing of the resistor should connect to where the green wire would be and the green wire from the resistor to where the red wire should be. This will discharge your regulator as it have a capacitor inside. This will help you to get accurate reading. Next, put your multi meter at 200K ohms, one lead to where the green wire should be and one lead to where the yellow should be. You should have a reading of about 100K ohms. Next, put one lead of the multi meter to where the white wire should be and one lead to where the red wire should be. You should also have a reading of 100K ohms.
If any of those test failed, the component you are testing seem in trouble and should be replace.
If you need to replace those components, we have the m in stock, ready to ship.
– Regulator / Rectifier: Regulator / Rectifier
– 8 coils stator: 8 coils stator
If your connectors are in trouble, we also carry them in stock.
– Regulator / Rectifier Connector: Regulator / Rectifier Connector
– Stator Connector: Stator Connector
If you have any questions before ordering, contact us on our store: Contact
We made a video to explain how you can redo a full wiring harness for a 150 cc Go Kart. We explained every step, including the testing with a multimeter and the electric plan.
The wiring harness is a common problem with the 150cc Go Kart. After a few years, people will start having a problem with connections, bad ground, and anything that comes with it. We did a simple video to help people bring back their machine to life and give them a simple way to redo a full wiring harness. This video only includes the basic thing you need to start the machine, and it does not include headlights, turn signal, speedometer, and all other accessories your machine might have.
This video can be used to rewire an Ace Maxxam 150, Carter Talon 150, Hammerhead 150, TrailMaster 150, and any go kart that comes with a GY6 150.
This is the electrical plan we used: (If you need any parts, the plan is clickable and will bring you to our website).
Click on the picture to download the PDFGo Kart 150 Electric PlanGo Kart 150 Electric Plan / Wiring Harness Clickable
We converted a TrailMaster 150 XRX with a snow blade. The snow blade is made of aluminum hooked up under the machine with hinges. The blade goes up and down with an ATV winch. The angle of the blade can be adjusted left to right.
The go kart can move at least 10 inches of snow easily.
The best combination is with the tracks and the studded wheel in the front. The machine can also be adapted with all wheels studded when the snow is not as thick. We have a better result with all studded wheels when we have ice under the snow. The tracks do not perform well on ice.
This is the machine with only studded wheels
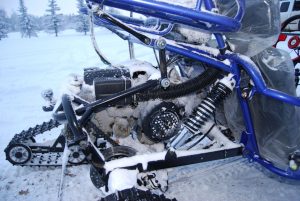
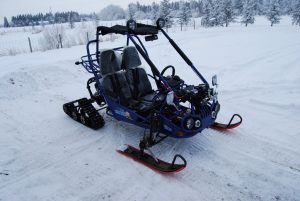
Winter driving with a 150cc go kart is not easy, we adapted a TrailMaster 150 XRX with skis and tracks. The tracks are from the TrailMaster Super Traxx 200.
The axle needs to be turned on a lathe to adapt the tracks to it. It also includes a keyway to lock the axle to the tracks. We use the original 14 teeth sprocket on the transmission and the 39 tooth sprocket on the axle, but it causes the engine to rev to high and isn’t working correctly. We did changes the transmission sprocket to 17 teeth and 22 teeth on the axle. To keep the tracks from rotating, we lock both together with 3 pipes across both tracks.
The skis are mounted to the wheel hub directly. We cut a 1/4″ thick plate to fit the wheel hub, welded it to a round pipe and added 2 arms to the skis for stability. We can changes the wheels to skis the same way you change a wheel.
The top speed is about 30km/h or 18.6 mph. We tested the machine in 12″ of snow, and it performs pretty well.
We still have a few things to do to make it better, cover the tracks with fender as the snow-filled the engine, and will eventually damage it. We will remove the 3 pipes across the tracks to remove the drag in the snow and find a better way.
Rear swing arm setup:
Pros:
– Can drive the machine at low speed for now until I switched the roller of the sprocket. The engine is not at the peak hp and can’t overcome the drag of the snow. By changing the roller or sprocket, the engine will rev higher and keep the speed.
– Definitely fun to drive in the snow and use the machine all year round now.
– Skis reduce the drag compare to the wheels from the first version.
– With the skis or wheels, the machine is easy to turn but need a bigger radius from the original all wheels set up.
Cons:
– Until fixing the engine rev, it’s not really a powerful machine for a 150CC.
– The engine become fill with snow and melt and turn in ice. Air filter and CVT might have problem eventually.
– There’s 2 metal bars going across to keep the track together and reduce the tree on the axle. Those bars drag in the snow.
– The machine is too low and soon the frame bottom up on the snow, you can’t move it anymore. Well, depending on your expectation and how deep you want to go.
– Don’t know how much stress it put on the engine so far, like CVT and engine itself. Might end up destroying the engine faster.
Next step:
– Raise the machine higher to clear deeper snow.
– Protect the engine from the snow filling it.
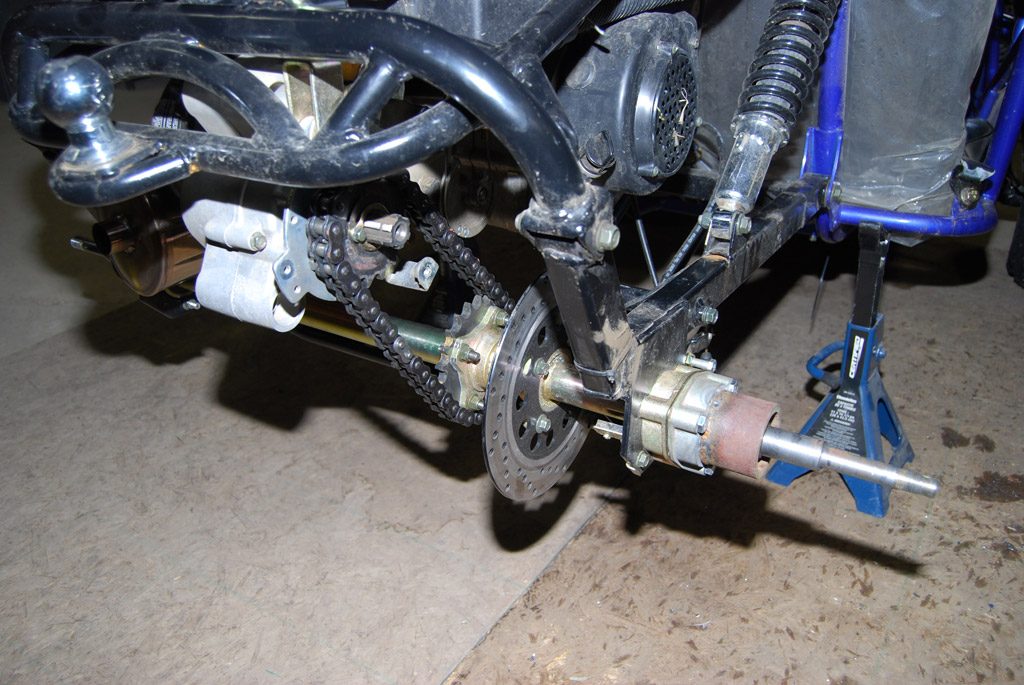
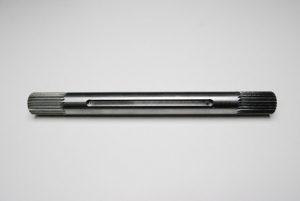
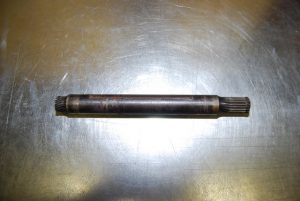
The live axle kit is the first project we did back in November 2013. The original live axle was 18 splines, and 3/4″ compare to the new one with 24 splines and 1″ shaft. The new shaft also uses 4140 metal instead of the weaker metal use on the original one. The original shaft was twisting slowly and eventually break. The live axle is made in Canada.
The CV Axles also changed from the original one, from an 18 splines inner cv joint to a 24 splines inner cv joint. The outer cv joint stay the same to keep the same wheel hub and reduce changes. The CV Axles were specially made to our specs for this project.
This is a video we did when we test the kit:
The video was made to make sure everything was working perfectly without any issue.
Interested in the kit, this is the link if you are interested in buying one: Carter GTR 250 Live Axle Kit


 The axle needs to be turned on a lathe to adapt the tracks to it. It also includes a keyway to lock the axle to the tracks. We use the original 14 teeth sprocket on the transmission and the 39 tooth sprocket on the axle, but it causes the engine to rev to high and isn’t working correctly. We did changes the transmission sprocket to 17 teeth and 22 teeth on the axle. To keep the tracks from rotating, we lock both together with 3 pipes across both tracks.
The skis are mounted to the wheel hub directly. We cut a 1/4″ thick plate to fit the wheel hub, welded it to a round pipe and added 2 arms to the skis for stability. We can changes the wheels to skis the same way you change a wheel.
The top speed is about 30km/h or 18.6 mph. We tested the machine in 12″ of snow, and it performs pretty well.
We still have a few things to do to make it better, cover the tracks with fender as the snow-filled the engine, and will eventually damage it. We will remove the 3 pipes across the tracks to remove the drag in the snow and find a better way.
The axle needs to be turned on a lathe to adapt the tracks to it. It also includes a keyway to lock the axle to the tracks. We use the original 14 teeth sprocket on the transmission and the 39 tooth sprocket on the axle, but it causes the engine to rev to high and isn’t working correctly. We did changes the transmission sprocket to 17 teeth and 22 teeth on the axle. To keep the tracks from rotating, we lock both together with 3 pipes across both tracks.
The skis are mounted to the wheel hub directly. We cut a 1/4″ thick plate to fit the wheel hub, welded it to a round pipe and added 2 arms to the skis for stability. We can changes the wheels to skis the same way you change a wheel.
The top speed is about 30km/h or 18.6 mph. We tested the machine in 12″ of snow, and it performs pretty well.
We still have a few things to do to make it better, cover the tracks with fender as the snow-filled the engine, and will eventually damage it. We will remove the 3 pipes across the tracks to remove the drag in the snow and find a better way.
 Rear swing arm setup:
 Pros:
– Can drive the machine at low speed for now until I switched the roller of the sprocket. The engine is not at the peak hp and can’t overcome the drag of the snow. By changing the roller or sprocket, the engine will rev higher and keep the speed.
– Definitely fun to drive in the snow and use the machine all year round now.
– Skis reduce the drag compare to the wheels from the first version.
– With the skis or wheels, the machine is easy to turn but need a bigger radius from the original all wheels set up.
Cons:
– Until fixing the engine rev, it’s not really a powerful machine for a 150CC.
– The engine become fill with snow and melt and turn in ice. Air filter and CVT might have problem eventually.
– There’s 2 metal bars going across to keep the track together and reduce the tree on the axle. Those bars drag in the snow.
– The machine is too low and soon the frame bottom up on the snow, you can’t move it anymore. Well, depending on your expectation and how deep you want to go.
– Don’t know how much stress it put on the engine so far, like CVT and engine itself. Might end up destroying the engine faster.
Next step:
– Raise the machine higher to clear deeper snow.
– Protect the engine from the snow filling it.
Pros:
– Can drive the machine at low speed for now until I switched the roller of the sprocket. The engine is not at the peak hp and can’t overcome the drag of the snow. By changing the roller or sprocket, the engine will rev higher and keep the speed.
– Definitely fun to drive in the snow and use the machine all year round now.
– Skis reduce the drag compare to the wheels from the first version.
– With the skis or wheels, the machine is easy to turn but need a bigger radius from the original all wheels set up.
Cons:
– Until fixing the engine rev, it’s not really a powerful machine for a 150CC.
– The engine become fill with snow and melt and turn in ice. Air filter and CVT might have problem eventually.
– There’s 2 metal bars going across to keep the track together and reduce the tree on the axle. Those bars drag in the snow.
– The machine is too low and soon the frame bottom up on the snow, you can’t move it anymore. Well, depending on your expectation and how deep you want to go.
– Don’t know how much stress it put on the engine so far, like CVT and engine itself. Might end up destroying the engine faster.
Next step:
– Raise the machine higher to clear deeper snow.
– Protect the engine from the snow filling it.  The axle needs to be turned on a lathe to adapt the tracks to it. It also includes a keyway to lock the axle to the tracks. We use the original 14 teeth sprocket on the transmission and the 39 tooth sprocket on the axle, but it causes the engine to rev to high and isn’t working correctly. We did changes the transmission sprocket to 17 teeth and 22 teeth on the axle. To keep the tracks from rotating, we lock both together with 3 pipes across both tracks.
The skis are mounted to the wheel hub directly. We cut a 1/4″ thick plate to fit the wheel hub, welded it to a round pipe and added 2 arms to the skis for stability. We can changes the wheels to skis the same way you change a wheel.
The top speed is about 30km/h or 18.6 mph. We tested the machine in 12″ of snow, and it performs pretty well.
We still have a few things to do to make it better, cover the tracks with fender as the snow-filled the engine, and will eventually damage it. We will remove the 3 pipes across the tracks to remove the drag in the snow and find a better way.
The axle needs to be turned on a lathe to adapt the tracks to it. It also includes a keyway to lock the axle to the tracks. We use the original 14 teeth sprocket on the transmission and the 39 tooth sprocket on the axle, but it causes the engine to rev to high and isn’t working correctly. We did changes the transmission sprocket to 17 teeth and 22 teeth on the axle. To keep the tracks from rotating, we lock both together with 3 pipes across both tracks.
The skis are mounted to the wheel hub directly. We cut a 1/4″ thick plate to fit the wheel hub, welded it to a round pipe and added 2 arms to the skis for stability. We can changes the wheels to skis the same way you change a wheel.
The top speed is about 30km/h or 18.6 mph. We tested the machine in 12″ of snow, and it performs pretty well.
We still have a few things to do to make it better, cover the tracks with fender as the snow-filled the engine, and will eventually damage it. We will remove the 3 pipes across the tracks to remove the drag in the snow and find a better way.

 Rear swing arm setup:
 Pros:
– Can drive the machine at low speed for now until I switched the roller of the sprocket. The engine is not at the peak hp and can’t overcome the drag of the snow. By changing the roller or sprocket, the engine will rev higher and keep the speed.
– Definitely fun to drive in the snow and use the machine all year round now.
– Skis reduce the drag compare to the wheels from the first version.
– With the skis or wheels, the machine is easy to turn but need a bigger radius from the original all wheels set up.
Cons:
– Until fixing the engine rev, it’s not really a powerful machine for a 150CC.
– The engine become fill with snow and melt and turn in ice. Air filter and CVT might have problem eventually.
– There’s 2 metal bars going across to keep the track together and reduce the tree on the axle. Those bars drag in the snow.
– The machine is too low and soon the frame bottom up on the snow, you can’t move it anymore. Well, depending on your expectation and how deep you want to go.
– Don’t know how much stress it put on the engine so far, like CVT and engine itself. Might end up destroying the engine faster.
Next step:
– Raise the machine higher to clear deeper snow.
– Protect the engine from the snow filling it.
Pros:
– Can drive the machine at low speed for now until I switched the roller of the sprocket. The engine is not at the peak hp and can’t overcome the drag of the snow. By changing the roller or sprocket, the engine will rev higher and keep the speed.
– Definitely fun to drive in the snow and use the machine all year round now.
– Skis reduce the drag compare to the wheels from the first version.
– With the skis or wheels, the machine is easy to turn but need a bigger radius from the original all wheels set up.
Cons:
– Until fixing the engine rev, it’s not really a powerful machine for a 150CC.
– The engine become fill with snow and melt and turn in ice. Air filter and CVT might have problem eventually.
– There’s 2 metal bars going across to keep the track together and reduce the tree on the axle. Those bars drag in the snow.
– The machine is too low and soon the frame bottom up on the snow, you can’t move it anymore. Well, depending on your expectation and how deep you want to go.
– Don’t know how much stress it put on the engine so far, like CVT and engine itself. Might end up destroying the engine faster.
Next step:
– Raise the machine higher to clear deeper snow.
– Protect the engine from the snow filling it. 
 The CV Axles also changed from the original one, from an 18 splines inner cv joint to a 24 splines inner cv joint. The outer cv joint stay the same to keep the same wheel hub and reduce changes. The CV Axles were specially made to our specs for this project.
This is a video we did when we test the kit:
The video was made to make sure everything was working perfectly without any issue.
Interested in the kit, this is the link if you are interested in buying one: Carter GTR 250 Live Axle Kit
The CV Axles also changed from the original one, from an 18 splines inner cv joint to a 24 splines inner cv joint. The outer cv joint stay the same to keep the same wheel hub and reduce changes. The CV Axles were specially made to our specs for this project.
This is a video we did when we test the kit:
The video was made to make sure everything was working perfectly without any issue.
Interested in the kit, this is the link if you are interested in buying one: Carter GTR 250 Live Axle Kit